
AThe CAPTCHA functionality helps to secure the web form from being spammed. Google reCAPTCHA is a free service that accesses you to implement CAPTCHA functionality. Google gives you two types of reCAPTCHA for the web form, reCAPTCHA v2, and Invisible reCAPTCHA. Both these kinds of reCAPTCHA integrate spam protection on the website for perfect user experience. In Google reCAPTCHA v2, You need to click to pass the reCAPTCHA challenge to the user. You can easily integrate Google reCAPTCHA v2 with PHP on your website.
Google Invisible reCAPTCHA works the same as the reCAPTCHA v2. Therefore, it simplifies the CAPTCHA process. So, the user does not need to click the checkbox to pass the reCAPTCHA challenge.
Invisible reCAPTCHA validates users in the background and automatically binds the issue to secure your HTML form against spam and automatic misuse. In this tutorial, we will explain to you how to attach Google invisible reCAPTCHA to your web application by using PHP.
To explain the invisible reCAPTCHA implementation process, we will create a contact form with Google invisible reCAPTCHA.
Get reCAPTCHA API Keys
It requires the site key and secret key to add Google Invisible reCAPTCHA to your website. Likewise, you need to register your site domain in the Google reCAPTCHA Admin to get Secret Key and Website key
1. Register Site:
Firstly, Go to the Google reCAPTCHA Admin.
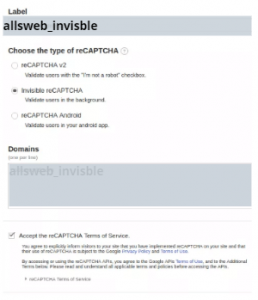
Secondly, down towards the Register a new site section, give the site information.
Label – Your site title.
Choose the type of reCAPTCHA – Select Invisible reCAPTCHA.
Domains – Specify the authorized domains.
Lastly, accept the reCAPTCHA Terms of Service and click the Register button. Generate the new API keys to access the reCAPTCHA API.
2. reCAPTCHA Site Key:
Use this key in the HTML code of the reCAPTCHA div element.

3. reCAPTCHA Secret Key:
Use this key to authorize the communication between your website and the Google reCAPTCHA server.

Implement Google Invisible reCAPTCHA
JavaScript Code:
Initially, attach the reCAPTCHA JavaScript API library and set the onload parameter to the name of the function called the onload callback.

<script src="https://www.google.com/recaptcha/api.js?onload=onloadCallback" async defer></script>
Define callback functions.
onloadCallback – Specify the onload callback function and call Recaptcha.execute() method. It programmatically invokes the reCAPTCHA check.
setResponse – Specify a callback function, which will execute when the user submits a successful response. It sets the captcha response to hidden input fields for server-side user response validation.
<script>
var onloadCallback = function() {
    grecaptcha.execute();
};

function setResponse(response) {
    document.getElementById('captcha-response').value = response;
}
</script>
HTML Code:
Create a Google reCAPTCHA widget div with g-recaptcha tag attributes. Also place it where you want the reCAPTCHA badge to appear. Therefore, specify the reCAPTCHA API site key in the data site key attribute. consequently to hold captcha-response, add a hidden input field to the form.
<form action="" method="post">
    <input type="text" name="name" placeholder="Your name" required >
    <input type="email" name="email" placeholder="Your email address" required>
    <textarea name="message" placeholder="Type your message here...." required></textarea>

    <!-- Google reCAPTCHA widget -->
    <div class="g-recaptcha" data-sitekey="6Leb-lcUAAAAAGcIVh0g3OmILVSzm5_tNtT-x7Re" data-badge="inline" data-size="invisible" data-callback="setResponse"></div>

    <input type="hidden" id="captcha-response" name="captcha-response" />
    <input type="submit" name="submit" value="SUBMIT">
</form>
Verify Google reCAPTCHA Response
As a result, after submitting the form, you need to verify the user’s responsibility to prevent spam submission. The following code checks the Google reCAPTCHA response with Google reCAPTCHA API using PHP. Therefore, specify the reCAPTCHA API Secret Key in the $secretKey variable. Once the user’s response is verified successfully, Execute the process of form submission.
<?php
// Google reCaptcha secret key
$secretKey  = "9Seh-ksJHSUysHGST8y4KSg0UisYS7A3QUjsGHSt";

$statusMsg = '';
if(isset($_POST['submit'])){
    if(isset($_POST['captcha-response']) && !empty($_POST['captcha-response'])){
        // Get verify response data
        $verifyResponse = file_get_contents('https://www.google.com/recaptcha/api/siteverify?secret='.$secretKey.'&response='.$_POST['captcha-response']);
        $responseData = json_decode($verifyResponse);
        if($responseData->success){
            //Contact form submission code goes here ...

            $statusMsg = 'Your contact request have submitted successfully.';
        }else{
            $statusMsg = 'Robot verification failed, please try again.';
        }
    }else{
        $statusMsg = 'Robot verification failed, please try again.';
    }
}
?>
Also, read our previous blog- Login with Instagram using JavaScript SDK


